지금까지 Grid Control의 Header 부분과 가로 ScrollBar까지의 기능을 만들어 보았다.
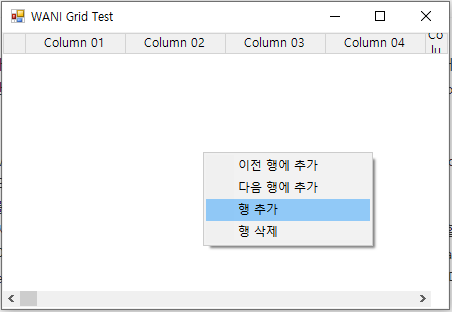
추가한 Context Menu 중 "행 추가" 기능을 만들어서 Grid Control에서 행(Row)를 추가해 보기로 하자.
행(Row) 추가를 하게 되면 Grid Control의 마지막 행(Row) 뒤에 새로운 행(Row)를 추가하도록 한다.
한 개의 행에 대한 컬럼들은 Header 설정 시에 각 컬럼별로 폭(Width), 컬럼 ID, 정렬방법 등을 설정했기에 각 컬럼의 데이터를 저장하기 위해서 DataTable을 이용하기로 한다.
실제 사용 시에도 Database에서 가져온 데이터를 Grid Control에서 Display할 경우 Datatable 타입으로 할당해서 사용하는 것이 일반적이기에 Grid Control 내에서 추가되는 모든 행(Row)은 DataTable에 저장하기로 한다.
Header 설정 시 지정한 Column ID가 Datatable의 Column ID로 사용되어진다.
WANIGrid에서 행(Row) 추가 시에 생성되는 Row Class를 먼저 살펴보자.
1개의 행에 대해서 관리되어져야 할 정보는
- 행(Row)의 Background Color - 행(Row) 선택 시 백그라운드 색상
- 행(Row)의 Foreground Color
- 행(Row) 선택 여부
- 행(Row) 데이터의 최대 라인수 - 기본 1라인
- 행(Row)에 해당하는 컬럼 정보를 담고 있는 DataRow
한 개의 행(Row) 정보를 관리하기 위한 Row Class의 속성과 메소드를 살펴보자.
public class Row : ICloneable
{
#region 변수
private Color backColor;
private Color foreColor;
private bool selected;
private int maxLines;
private DataRow row;
#endregion 변수
#region 생성자
public Row()
{
maxLines = 1; //maxLines는 기본 1라인
selected = false;
foreColor = Color.Black;
backColor = Color.LightGray;
}
public Row(DataRow dRow)
{
maxLines = 1;
selected = false;
foreColor = Color.Black;
backColor = Color.LightGray;
row = dRow;
}
#endregion 생성자
#region Properties
public int MaxLines
{
get { return maxLines; }
set
{
if (maxLines != value) maxLines = value;
}
}
public Color BackColor
{
get { return backColor; }
set { backColor = value; }
}
public Color ForeColor
{
get { return foreColor; }
set { foreColor = value; }
}
public bool Selected
{
get { return selected; }
set { selected = value; }
}
public DataRow DataRow
{
get { return row; }
set { row = value; }
}
#endregion Properties
#region Method
public object Clone()
{
Row row = new Row();
row.BackColor = backColor;
row.ForeColor = foreColor;
row.Selected = selected;
return row;
}
#endregion Method
}
행(Row) 추가 시 생성된 Row Class에 대한 관리가 필요하며, 이러한 관리를 위해서 RowCollection Class를 생성한다.
주요 기능으로는
- Index 위치의 Row 정보를 설정하거나 가져온다
- 특정 Row 정보가 존재하는 Index 반환
- Row를 추가하고 Index를 반환
- 여러 개의 Row를 추가
- 특정 Row를 제거
- 모든 Row를 Clear
- Row의 Index 반환
- 특정 Index 위치에 Row를 Insert
public class RowCollection: CollectionBase
{
/// index 위치의 Row 정보를 설정하거나 가져온다.
public Row this[int index]
{
get
{
if (index >= 0 && index < this.Count)
return List[index] as Row;
else
return null;
}
set
{
List[index] = value;
}
}
/// Row 정보가 존재하는 Index를 반환한다.
public int this[Row item]
{
get { return List.IndexOf(item); }
}
/// Row를 추가하고 추가한 Row의 Index를 반환
public virtual int Add(Row item)
{
int index = List.Add(item);
return index;
}
/// 여러 개의 Row를 추가한다.
public virtual void AddRange(Row[] items)
{
lock(List.SyncRoot)
{
for (int i = 0; i < items.Length; i++)
{
List.Add(items[i]);
}
}
}
/// Row를 제거한다.
public virtual void Remove(Row item)
{
List.Remove(item);
}
/// 모든 Row를 지운다.
public new void Clear()
{
List.Clear();
}
/// Row의 Index를 반환
public virtual int IndexOf(Row item)
{
return List.IndexOf(item);
}
/// 특정 Index 위치에 Row를 Insert 한다.
public virtual void Insert(int index, Row item)
{
List.Insert(index, item);
}
}
행(Row) 추가 시 다루어져야 할 정보에 대해서 알아 보았다. 행과 관련된 Row Class, RowCollection Class를 이용해서 추가 된 행(Row)을 WANIGrid Control에 나타내고(Display), 추가된 행(Row)의 컬럼 정보들을 관리하게 된다.
각 행(Row)에 대한 정보는 Row Class를 이용해서 관리하며, 행(Row) 전체에 대한 관리는 RowCollection Class를 이용해서 관리하게 될 것이다.
추가된 행(Row) 정보를 근간으로 사용자에게 시각적으로 행(Row)이 추가되었음을 보여줄 수 있도록 처리하기 위한 로직을 WINIGrid Control에 추가할 것이다.
WINIGrid Control에 추가되는 멤버 변수는
private int firstVisibleRow = 0; //화면상에서 처음 보여져야할 로우
private int lastVisibleRow = 0; //화면상에서 마지막에 보여질 로우
private int allRowsHeight = 0; //Grid Row의 전체 높이
private int rowHeight = 0; //Row 높이
private RowCollection rows; //Row 정보를 관리하게 되는 Collection Class
private DataTable dataSource; //하나의 Row에 속하는 컬럼 정보를 저장하기 위한 DataTable
dataSource 멤버 변수와 연계되는 프로퍼티 DataSource를 정의
public DataTable DataSource
{
get { return dataSource; }
set { dataSource = value; }
}
WINIGrid Control의 Header Font와 Content Font를 정의하기 위한 프로퍼티 추가
[Category("Font"), Description("The header font")]
public Font HeaderFont
{
get { return headerFont; }
set
{
if (headerFont != value)
{
headerFont = value;
topHeaderHeight = headerFont.Height + 4;
}
}
}
[Category("Font"), Description("The Content font")]
public new Font Font
{
get { return contentFont; }
set
{
if (contentFont != value)
{
contentFont = value;
rowHeight = Font.Height + 4;
}
}
}
WINIGrid Control의 생성자에 RowCollection 멤버 변수 생성 및 HScrollBar/VScrollBar 설정을 추가한다.
public WANIGrid()
{
.....
rows = new RowCollection(); //RowCollection 생성
hScrollBar.SmallChange = 1; //HScrollBar의 SmallChange 값을 1로 설정
rowHeight = Font.Height + 4; //추가되는 Row의 높이 설정
vScrollBar.SmallChange = rowHeight; //VScrollBar의 SmallChange 값을 Row의 높이로 설정
.....
}
Context Menu 초기화 메소드인 InitializeContextMenu()에 "행 추가" 선택 시 발생하는 이벤트 핸들러를 등록한다.
private void InitializeContextMenu()
{
rightClickMenu = new ContextMenu();
rightClickMenu.MenuItems.Add(LanguageResource.Row_Before_Insert);
rightClickMenu.MenuItems.Add(LanguageResource.Row_After_Insert);
rightClickMenu.MenuItems.Add(LanguageResource.Row_Append);
rightClickMenu.MenuItems.Add(LanguageResource.Row_Delete);
rightClickMenu.MenuItems[2].Click += new EventHandler(OnMenu_AppenRow_Click);
}
가로/세로 ScrollBar에 대한 Visible, Maximum/LargeChange/SmallChange 등을 설정하는 ReCalcScrollBars() 메소드에 Row의 수에 따라 세로 스크롤바를 보여주는 로직을 추가하도록 한다.
private void ReCalcScrollBars()
{
.....
//로우의 높이가 클라이언트 사이즈 높이 보다 클 경우 세로 스크롤바를 보여준다.
if (allRowsHeight > 0 && (allRowsHeight > Height - topHeaderHeight - xsclHeight))
{
vScrollBar.Visible = true;
vScrollBar.Maximum = allRowsHeight;
vScrollBar.LargeChange = rowHeight * 5;
vScrollBar.SmallChange = rowHeight;
}
else
{
vScrollBar.Visible = false;
grid.LastVisibleRow = 0;
}
.....
}
화면에 보여져야 할 영역을 계산하는 함수인 CalcVisibleRange()에서 firstVisibleRow 값을 기준으로 lastVisibleRow를 찾아내는 로직을 추가한다.
private void CalcVisibleRange()
{
......
//보여져야 할 Row 영역 계산
int tempRow = 0;
int rowIndex = 0;
if (rows.Count > 0)
{
for (rowIndex = firstVisibleRow, tempRow = 0; rowIndex < rows.Count &&
tempRow < Height - xsclHeight - topHeaderHeight; rowIndex++)
{
tempRow += rows[rowIndex].MaxLines * rowHeight;
}
lastVisibleRow = rowIndex;
if (lastVisibleRow >= rows.Count) lastVisibleRow = rows.Count - 1;
}
else
{
lastVisibleRow = 0;
}
......
}
행 추가 선택 시 행을 추가하기 위한 메소드
public void AppendRow()
{
DataRow row = dataSource.NewRow(); //1개 행의 컬럼들의 정보를 담기 위한 Row생성
Row r = new Row(row); //DataRow 생성
rows.Add(r); //DataRow 추가
dataSource.Rows.Add(row); //DataTable에 1개의 행을 추가
allRowsHeight += Font.Height + 4; //행이 추가될때 추가된 전체 행 높이를 계산
rowHeight = Font.Height + 4; //행 1개의 높이 설정
OnRowsChanged(); //Row변경 시 처리하는 메소드 호출
}
public void OnRowsChanged()
{
ReCalcScrollBars(); //가로세로 스크롤바 설정
CalcVisibleRange(); //화면에 보여져야 할 영역 계산
Invalidate(true);
}
Context Menu 중 "행 추가"를 선택했을 때 발생하는 Event 처리 메소드
protected void OnMenu_AppenRow_Click(object sender, EventArgs e)
{
AppendRow();
}
WANIGrid의 내용을 그리기 위한 메소드를 작성한다.
///
/// Grid의 내용 그리기
///
private void DrawContent(Graphics g, Rectangle rc, int controlWidth)
{
SolidBrush brush = new SolidBrush(SystemColors.ControlLight);
Pen pen = new Pen(Color.LightGray);
if (rows.Count <= 0) return;
g.Clip = new Region(new Rectangle(1, topHeaderHeight, Width - ysclWidth + 2,
Height - xsclHeight - topHeaderHeight));
try
{
int columnStartY = topHeaderHeight;
for (int i = firstVisibleRow; i <= lastVisibleRow && i < rows.Count; i++)
{
int columnStartX = 0;
int columnWidth = 0;
for (int j = firstVisibleCol; j <= lastVisibleCol && j < grid.GridHeaderList.Count; j++)
{
if (j == firstVisibleCol)
{
g.FillRectangle(brush, 1, columnStartY + 1, leftHeaderWidth, rowHeight);
g.DrawRectangle(pen, 1, columnStartY + 1, leftHeaderWidth, rowHeight);
columnStartX += leftHeaderWidth;
}
//보여지는 컬럼의 폭이 컨트롤의 폭 보다 클경우
if (columnStartX + grid.GridHeaderList[j].Width > controlWidth)
{
columnWidth = controlWidth - columnStartX - 3;
g.DrawRectangle(pen, columnStartX + 1, columnStartY + 1,
columnWidth, rowHeight);
}
else
{
columnWidth = grid.GridHeaderList[j].Width;
g.DrawRectangle(pen, columnStartX + 1, columnStartY + 1,
columnWidth, rowHeight);
}
columnStartX += columnWidth;
}
columnStartY += rowHeight;
}
}
catch (Exception e)
{
MessageBox.Show(e.Message);
}
}
WANIGrid Control의 Paint 메소드인 WANIGrid_Paint(object sender, PaintEventArgs e) 에 DrawContent 메소드를 추가한다.
private void WANIGrid_Paint(object sender, PaintEventArgs e)
{
CalcVisibleRange();
ReCalcScrollBars();
DrawBackground(e.Graphics, rc);
DrawHeaders(e.Graphics, rc);
DrawContent(e.Graphics, rc, this.ClientRectangle.Width);
}
Build 및 실행 후 "행 추가"를 선택하면 아래와 같이 행이 추가되는 모습을 직접 WANIGrid Control에서 볼 수 있게 된다.
행의 전체 높이가 WANIGrid Control의 높이 보다 적기에 세로 스크롤바는 현재 보이지 않는다.

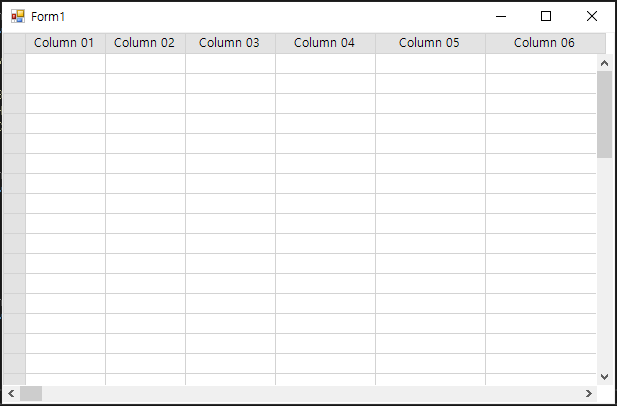
행을 계속 추가하면 행 전체의 높이가 WANIGrid Control의 높이보다 크게 되면 세로 스크롤바가 나타나게 된다.
WANIGrid Control에서 행을 추가 했을 경우, 사용자에게 추가된 행을 시각적으로 보여주는 방법과 세로 스크롤바를 제어하는 방법을 구현해 보았다.
다음 시간에는 행 추가 후 세로 스크롤바 제어에 대해서 살펴 보기로 하자.
지금 까지의 소스는 아래의 링크를 통해서 다운 받을 수 있다.
'WinForm > Grid Control 만들기' 카테고리의 다른 글
| 11. Grid Column 선택 시 색상 변경 (0) | 2019.07.25 |
|---|---|
| 10. 세로 스크롤바 및 마우스 휠 이벤트 처리 (0) | 2019.07.19 |
| 8. WANIGrid Control의 Context Menu 만들기 (0) | 2019.06.22 |
| 7. 가로 스크롤바 이벤트 구현하기 (0) | 2019.06.20 |
| 6. Grid Class와 WANIGrid Control 만들기 (0) | 2019.06.12 |